Tuesday, November 22, 2011

Thanksgiving Offerings

First of all, I'd like to say thank you to all of you who follow and/or comment on my blog. I appreciate all of you. And, as we have recently passed Vetran's/Armistice Day, a big thank you to all the service men and women who have served, both past and present.

Now for some projects I've completed over the last couple of months.

Here is my unit of Army Red dismounted hussars. From the waist up they are Prince August Hussars. From the waist down they are of my own construction.


These are the Bavarian Horse Artillery. They were built in the same manner as the hussars above (originally as Army Red Horse Artillery). A head swap from the busby to a Bavarian helmet completed the conversion. The range finder is made from aluminum tubing and 18 guage floral wire.


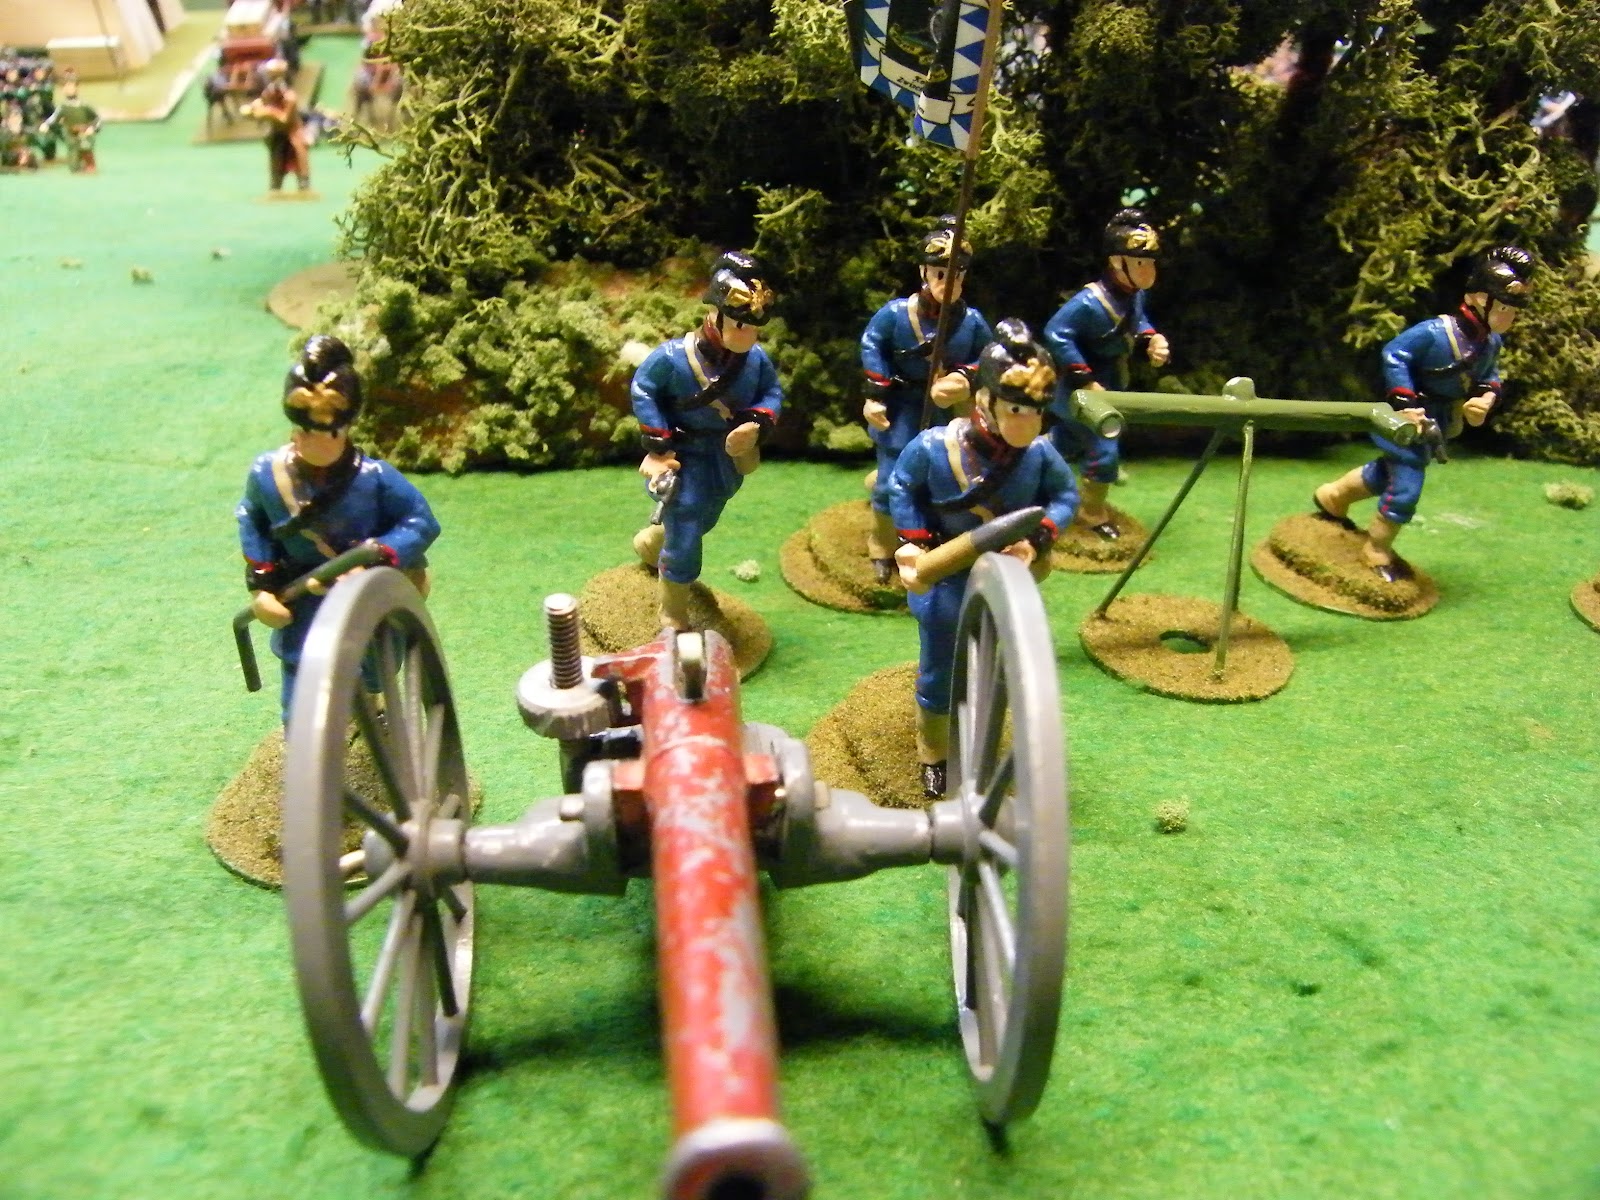
Here is the Bavarian Field Artillery. They are made from a Dutkin's Berdan sharpshooter (ACW) figure. They have the same head as the Horse Artillery above.


This gun was in a box of stuff my wife picked up at the auction.Originally, it had a spring and a detachable muzzle half of the barrel (which was missing). I cut off the hook that held the barrel in place and pulled out the original spring (You can still see the retaining rod in the breech view). I cut a slot into the breech then added a new spring and plunger. The barrel extention is a brass tube.


Here's a motorcycle that I scratch built out of aluminum tubing.The wheels are also aluminum tubing that I found at the hobby store pre-bent and cut into a circle of the correct size. The motor is made from a couple of different sized dowels, the one for the cylinder is wrapped in light floral wire. The rider is the standard rider/driver that I use for most all of my vehicles.

This is a modification to the cycle above. The sidecar is made from cardstock and mattboard, with a putty seat, floral wire to attach it to the bike, and another aluminium tube wheel. the spoke pattern was cut from Patrick's machinegun cart and glued to a mattboard insert. The machinegun is made from aluminium tube and a shaped and puttied piece of a popcicle stick. The battle damage to the sidecar was due to a certian poodle that likes to chew on things when I'm not looking. The Michinegunner is my standard gunner.


My Army Black has four machineguns; two for the infantry and two for the cavalry.To transport the infantry guns I used Patrick's dog carts. Here I took the body of a dog cart, added wagon wheels and made new shafts from a clothes hanger. The horse is a plastic cavalry horse.


These are limbers for Army Black's artillery. The limber is a plastic ACW model. the gun is one I converted from a plastic (possibly Whitworth) ACW cannon. The horses are ones  I converted from a metal AWI horse that was missing the head and tail. The head and tail come from a wounded horse in the ACW cavalry package that contains the horse used with the MG cart.


Here are some more Army Red staff officers. The left figure is a spin casted Army Red General available from TVAG. The other two have a generic body I recently sculpted with newly sculpted Army Red heads.


For Army Cornflower Blue's staff I have a redesign of the Grand Duchess of Garolstein and the Army Horizon Blue's General painted as a Bavarian. The new Grand Duchess has considerably more eye-appeal than the earlier version. I will field both versions as a mother / daughter combo.


This is part of the Army Black Signal Corps. The plan is to have one pair of signalers per command staff. I'm figuring on 7 pairs (4 brigades, a division, CnC, and observation corps). They have the generic body used in the Army Red photos above. To that I've added an Army Black fatigue capped head.

While you've seen the machinegun and gunner before, the loader is new. He is made from the sniper figure. I had to patch up the hole in his right shoulder, add an arm, and head.


This is the Ford 3 ton tank from Fiddlersgreen. I think it's a nice model and now I'm anxious to get my Army Red, White, and Blue painted so they can take the field.


This is another Fiddlersgreen model. It's the LK II, a prototyle german light tank. It was also used by the Swedes for years after the Great War.

That's it for now. Have a wonderful holiday season and a productive winter quarters.


Friday, November 4, 2011

Making Trees

In my last post I was making Normandy type hedgerows out of foam rubber. The foliage used to decorate the mounds was made from painted ground up foam scraps. In fact, I had so much extra foliage that I decided to make trees with the stuff.


The illustrations above shows some of the supplies and tools needed for this project.  Here is a complete supply list:

1 - Cheap wire clothes hanger ( I get these with my laundered shirts from the cleaner)
1 - Computer CD (Finally, a use for that Peter Frampton boxed set I got for Chritmas)
2 to 4 - Brown pipe cleaners (this depends on the height of the trunk)
Mat Board
Tape (Pictured is a roll of floral wrapping tape, but masking tape will work fine)
Colored fiberfil (this is used for the bulk of the tree's foliage)
Colored ground foam (this is for the textured folige)
Paint - geen or brown
Hot glue and applicator
Spray adhesive
Wire cutters
Sissors (unless you are using a tearable tape)

Below are the steps for creating a tree:

1. Cut four equal lengths of wire from the hanger (they do not have to be exact).
2. Bend about 1/2 inch of the wire back against itself. (this is to keep you from impaling yourself on the tree should you step on it or fall on it)
3. Bend the other end to a 90 degree angle about an inch to 1.5 inches from the end.
4. Reprat steps 2 and 3 for the other three wires.

5. Bind the wires together along the long segment with the tape.
6. Position the bends about 90 degrees from each other. This forms the roots of the tree and keeps it from falling over.

7. Starting with the roots, wrap the wires with the pipe cleaner. I work from the end of one root, across to the opposite root. I cut off the excess pipe cleaner and use the remainder to wrap the trunk. The entire trunk does not need to be wrapped, it just needs enough wrapping so that the wires do not show under the folieage.

U
8. Cut a circle from the mat board to fill the hole in the CD.
9. Tape the mat board circle into place on what will be the underside of the base.
10. Using the hot glue, stick the tree trunk to the CD. (I really don't have a boxed set of Peter Framton CDs. I use leftover CDs from my work)


11. Take some of the fiberfil and stretch it out and mold it into "tree-like" shapes.
12. Apply hot glue to the upper part of the tree trunk and carefully (so as not to burn yourself) stick the fiberfil to the glue.
13. Spray the fiberfil with the spray adheasive.
14. Cover the fiberfil with the ground foam foliage.
15. Gently shake off the excess foliage. You can reapply the adheasive and foliage until you get the desired coverage.

16. Give the base a coat of green or brown paint (if I did own a boxed set of Peter Frampton CDs, I would use them for tree bases though).
17. Decorate the base with stones, twigs, and flocking. Do whatever you do to the bases of your soldiers.

If you have problems with excessive foliage loss, get a old spray bottle and fill it with watered down white glue. Spray the foliage with the thinned glue and let dry.

This completes the tree. It is now ready for the table, floor, or where ever you wargame.